Showing posts with label Gardening. Show all posts

Friday, December 26, 2025

Scale Insects on Plants

Scale insects rank among the most persistent and challenging pests that plant owners encounter, often going unnoticed until significant damage has already occurred. These tiny, armor-plated insects attach to plants and slowly drain their life, making early identification and swift action crucial for plant health.

scale insects on plants, attached to a plant stem

Whether you’re dealing with indoor plants showing mysterious yellowing leaves or outdoor trees developing sticky surfaces and black sooty growth, understanding scale insects is essential for any plant enthusiast. This comprehensive guide will equip you with the knowledge to identify, treat, and prevent scale infestations before they compromise your plants’ health.

What Are Scale Insects

Scale insects are small, piercing-sucking pests that feed on plant sap and belong to the superfamily Coccoidea, with approximately 8,000 species worldwide that affect both indoor plants and outdoor vegetation. These specialized insects use long, needle-like mouthparts that extend six to eight times their body length to pierce plant tissues and extract vital fluids.

The characteristic waxy, protective covering that resembles fish or reptile scales gives these pests their common name. This scale covering serves as both protection and camouflage, making them exceptionally difficult to spot during casual plant inspections. Female scales become mostly immobile once they settle and begin feeding, whereas males are rarely observed because they typically die shortly after mating.

Scale insects are among the most difficult plant pests to control because their protective covering shields them from many contact insecticides. Their ability to reproduce rapidly and their inconspicuous nature mean that scale populations can build up significantly before plant owners realize they have an infestation.

Most species are restricted to particular host plants or plant groups, though some scale insects affect a broad range of plant species. They commonly infest both woody plants and indoor plants, making them a concern for gardeners and houseplant enthusiasts alike.

Identifying Scale Insects on Plants

Scale insects appear as barnacle-like or dome-shaped bumps on stems, leaves, and bark, often blending seamlessly with the plant’s natural surface. Their size ranges from pinhead-sized to quarter-inch, depending on the species, with mature scales typically measuring 1/8 to 1/4 inch in length.

Colors range from brown and black to white and yellow, with some species displaying mottling or stripes. Brown soft scale, for example, may appear as mottled, shiny, pale brown, yellow, or grey with dark brown grid-like markings. San Jose scale appears as tiny gray circular bumps about the size of a pinhead with a distinctive yellow central nipple.

These pests are often mistaken for natural plant growths or bark irregularities, especially in their early stages when they’re small and light-colored. Newly settled crawlers appear as tiny bumps that gradually darken and enlarge as they mature, making early detection challenging without close inspection.
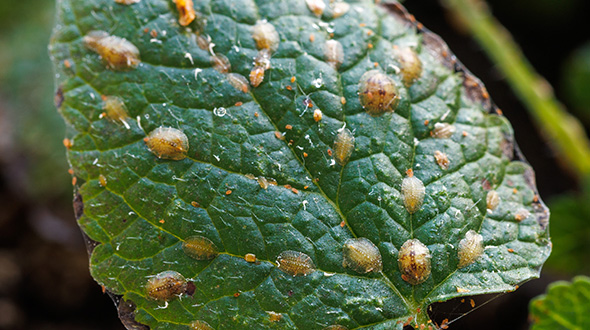
scale insect species impact indoor plants and vary in size and color

The presence of sticky honeydew and black sooty mold is an important indirect sign of soft scale infestations. Most soft scales produce honeydew, a sweet excretion that makes everything around or under infested plants sticky and attracts ants, bees, wasps, and flies. This honeydew also supports the growth of sooty mold, a black-colored fungus that coats leaf surfaces and interferes with photosynthesis.

Using magnification tools and needle tests can confirm live infestations when visual identification proves difficult. A practical inspection method involves flipping over suspicious bumps with a thumbnail to determine if scale insects are present underneath. Live scales will have soft tissue underneath their covering, while dead scales will be hollow or easily crushed.

Types of Scale Insects

Scale insects fall into several distinct categories, each with unique characteristics that affect identification and control strategies.

Soft Scales

Soft scales represent larger scales with a soft, waxy coating that remains inseparable from the insect body. These scales measure 1/8 to 1/4 inch in length when mature and possess a smooth, cottony, or waxy surface that’s round to oval and dome-shaped.

All soft scales produce honeydew, which leads to sooty mold growth that causes additional plant stress and aesthetic issues. This sticky secretion makes soft-scale infestations relatively easy to identify, as honeydew accumulates on leaves and surfaces beneath infested plants.

Common species include brown soft scale, which attacks a wide variety of hosts and is among the most common on houseplants. Hemispherical scale appears brown, smooth, glossy, and very convex, typically producing two generations per year and showing a strong preference for ferns, asparagus fern, palms, and many non-woody evergreen plants.

Other notable soft-scale species include the cottony cushion scale, which appears white and cottony, and various lecanium scales that commonly infest outdoor ornamental plants. Tuliptree scale and wax scale are additional soft-scale threats, particularly to deciduous fruit trees and woody ornamentals.

Armored Scales

Armored scales differ fundamentally from soft scales in their hard, protective shell or scale covering beneath which the actual insect body lives. These are the smallest scales, and their hard covering can be easily removed to reveal the insect beneath, though doing so will kill the insect.

A key distinguishing feature is that armored scales do not produce honeydew, eliminating the sticky secretion and sooty mold problems associated with soft scales. This makes armored scale infestations more challenging to detect until plant damage becomes apparent.

Armored scales display three main shapes: rounded scales that appear circular, oystershell scales that are elongated and oyster shell shaped, and pupillarial scales that have a distinctive pupal-like appearance. These shapes help with accurate identification and species determination.

Common species include tea scale, San Jose scale, false oleander scale, and obscure scale. Pine needle scale represents a particularly significant armored scale threat, appearing as white, oystershell-shaped scales that can completely cover conifer needles. Euonymus scale commonly attacks euonymus plants, while oystershell scale affects many trees and shrubs.

soft scales and armored scales on plants, scale infestations

Specialized Scale Types

Beyond the traditional soft and armored categories, several specialized scale types pose unique identification and control challenges.

Giant scales are the largest-scale species, resembling mealybugs with visible legs and antennae. These scales offer greater mobility than typical scales and are easier to spot due to their size and movement.

Ground pearls affect turfgrass by attaching to roots, making them nearly impossible to detect until the grass begins to yellow and die. These scales create pearl-like cysts around grass roots and can persist for years in soil.

Felt scales, including the crape myrtle bark scale, appear uncommon but distinctive with their white, felt-like covering. These scales typically develop on bark surfaces and can be mistaken for fungal growth or lichen.

Mealybugs, while technically related pests rather than accurate scales, share similar feeding habits and often get grouped with scale insects. They display a white, cottony appearance with waxy filaments and remain mobile throughout their lives, making them easier to spot but also more likely to spread between plants.

Scale Insect Life Cycle

Scale insects typically develop through three main stages: egg, nymph (crawler), and adult, with the crawler stage representing the most vulnerable period for control interventions.

Female scales lay eggs under their protective covering or in waxy ovisacs, depending on the species. Soft scales, such as the hemispherical scale and the brown soft scale, typically lay eggs beneath their body covering, whereas some species form separate egg masses. The number of eggs varies by species, with some laying dozens and others laying hundreds.

The crawler stage consists of mobile nymphs that disperse to new feeding sites after eggs hatch. These tiny, flat, pink or yellow crawlers lack the protective covering of adult scales and actively search for suitable feeding locations. Crawlers represent the primary dispersal stage, as they can be carried by wind, animals, or contaminated tools to new plants.

Settlement and development of protective covering occur after the first molt, when crawlers insert their mouthparts into plant tissue and begin producing their characteristic scale covering. Once settled, female scales become largely immobile and focus on feeding and reproduction.

life cycle diagram of scale insects eggs to crawlers to adult scale insects

The timing of crawler emergence varies significantly by scale species and season—pine needle scale eggs hatch in mid-May into tiny crawlers, with two generations produced each year. Brown soft scale and hemispherical scale typically produce two generations per year, whereas some species produce only one.

Multiple generations per year are possible, especially for indoor plants where temperature and humidity remain relatively constant. This continuous reproduction cycle means that all life stages may be present simultaneously on heavily infested plants, complicating control efforts and requiring sustained treatment approaches.

Understanding crawler emergence timing is crucial for effective treatment, as most contact insecticides are most effective when applied during the vulnerable crawler stage. Regular monitoring helps identify when crawlers emerge, allowing for precisely timed control applications.

Damage Caused by Scale Insects

Scale insects damage plants by directly removing sap, causing gradual yellowing, wilting, and stunted growth as they deprive them of vital nutrients and water. Unlike many other plant pests that cause immediate, dramatic damage, scale insects typically cause gradual plant decline over several years rather than immediate death.

The feeding process involves piercing plant tissues with their specialized mouthparts and continuously extracting plant sap. This constant drain on plant resources leads to reduced vigor, yellowing leaves, and stunted growth patterns. Heavy scale infestations can cause yellowed leaves, distorted foliage, especially at the growing tips, twig dieback, or complete defoliation.

Branch dieback and premature leaf drop occur in severe infestations, particularly when scale populations build up over multiple seasons. Pine needle scale, for example, can cause needle yellowing and even branch death on heavily infested conifers. The cumulative effect of numerous scales feeding on the same plant can overwhelm the plant’s ability to maintain normal growth.
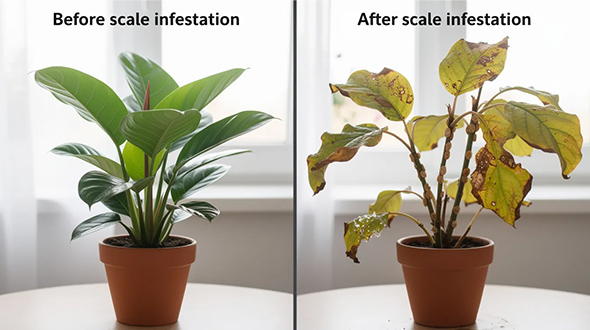
side-by-side comparison of indoor plant before and after scale insect infestation

Honeydew production by soft scales leads to sticky surfaces and black, sooty mold growth, which creates additional plant stress beyond direct feeding damage. The sticky honeydew makes everything around or under infested plants unpleasant to touch and attracts various insects, including ants, bees, wasps, and flies.

Sooty mold grows on the sweet honeydew and blackens leaf surfaces, interfering with photosynthesis and making plants unattractive. This fungal growth can coat entire plant surfaces in severe infestations, further reducing the plant’s ability to produce energy through photosynthesis.

Reduced plant vigor makes plants more susceptible to secondary pest infestations, disease, and environmental stress. Weakened plants become more vulnerable to drought, temperature extremes, and other plant pathogens.

Scale damage is often mistaken for watering or fertilization issues because the gradual yellowing and decline mimic nutrient deficiencies or water stress. This confusion can delay proper diagnosis and treatment, allowing scale populations to continue to grow while plant owners pursue inappropriate solutions.

Signs of Scale Infestation

Early detection requires systematic visual inspection of stems, leaf undersides, and bark crevices where scales typically establish feeding sites. Focus inspection efforts on areas where leaves attach to stems, as these protected locations provide ideal settling sites for crawlers.

Look for small, waxy bumps that may vary in color from brown and black to white and yellow. Young scales often appear light-colored and gradually darken as they mature, so check for bumps of various sizes and colors. Pay particular attention to new growth areas, as many scale species prefer tender plant tissues.

Early warning signs include slight yellowing and reduced growth that may initially appear minor but gradually worsen over time. Plants may show reduced vigor, smaller leaves, or slower growth rates before obvious scale insects become visible. These subtle changes often precede visible-scale population changes by weeks or months.

Advanced symptoms include heavy honeydew production, black sooty mold growth, and branch dieback, which indicate well-established infestations. Sticky surfaces beneath plants, ant activity around plants, and black fungal growth on leaves all suggest advanced soft-scale problems requiring immediate intervention.
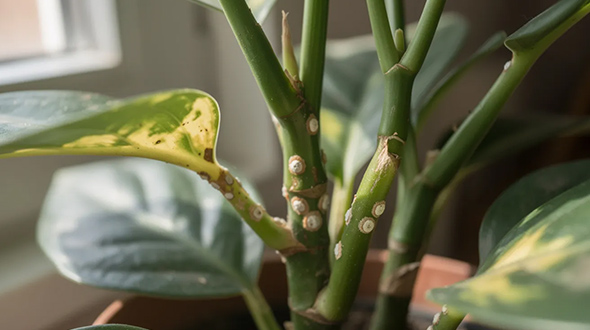
plant exhibiting early signs of scale infestation, slight yellowing of the leaves and small bumps on stems

Seasonal monitoring times when scales are most visible vary by species and location. Spring emergence of crawlers makes scales easier to spot, as the mobile crawlers appear as tiny moving specks on plant surfaces. Late spring and early summer often provide the best detection opportunities for many species.

Using photography tools and magnification aids in early detection by allowing closer examination of suspicious plant areas. Smartphone cameras with macro capabilities can help document suspected infestations and track changes over time. Hand lenses or magnifying glasses reveal details that help distinguish scales from natural plant structures.

Regular inspection routines should focus on plants known to be susceptible to scale insects, including ferns, palms, citrus, and many woody ornamental plants. Monthly inspections during growing seasons help detect infestations early, when control options are most effective.

Control Methods for Scale Insects

Cultural and Physical Control

Hand removal of scales with fingernails or a soft brush provides immediate reduction for light infestations, particularly effective on indoor plants where individual scales are easily accessible. This mechanical removal works best on soft scales, which can be scraped off with minimal plant damage.

Pressure washing with consumer-grade equipment can achieve up to 70% reduction in scale populations when properly applied. Direct the water stream at affected plant areas, focusing on the undersides of leaves and stem junctions where scales typically congregate. This method works particularly well for outdoor plants and can dislodge both scales and their eggs.

Proper plant spacing and air circulation help reduce humidity levels that favor scale development. Crowded plants create microclimates with higher humidity that promote scale reproduction and survival. Adequate spacing also improves inspection access and treatment coverage.

Regular plant inspection and monitoring routines enable early detection when control options remain most effective. Establish weekly inspection schedules during the growing season, focusing on known-susceptible plant species and previously infested areas.

Plant replacement with non-susceptible plant species may be necessary after professional identification confirms repeated treatment failures. Some plants show inherent resistance to specific scale species, making replacement a long-term solution for persistently problematic areas.

Biological Control

Natural enemies, including parasitoid wasps, lady beetles, lacewings, and predatory mites, provide ongoing scale control when properly supported through integrated pest management approaches. These beneficial insects attack scale insects during various life stages, providing sustainable control without chemical inputs.

Parasitoid wasps lay eggs inside scale insects, with developing wasp larvae eventually killing their hosts. Signs of parasitism include small emergence holes in scale covers, indicating successful biological control activity. Multiple wasp species attack different scale species, providing broad biological control potential.

Lady beetles, particularly the twice-stabbed lady beetle, specialize in scale insect predation and can significantly reduce scale populations when present in adequate numbers. Both adult beetles and their larvae actively hunt and consume scales throughout their development.
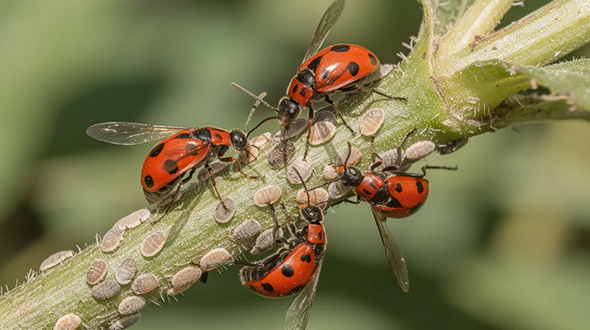
lady beetles and parasitoid wasps, actively feeding on scale insects

Maintaining beneficial insect populations requires reducing pesticide use and providing alternative food sources during periods when scale insects are scarce. Broad-spectrum insecticides eliminate beneficial insects along with pest species, often leading to scale population rebounds.

Fungal pathogens naturally suppress scale populations under favorable environmental conditions, particularly during periods of high humidity and moderate temperatures. These naturally occurring diseases can cause significant scale mortality without human intervention.

Chemical Control Options

Horticultural oils, including both dormant oil applications during plant dormancy and growing season treatments, suffocate scale insects by blocking their breathing pores. These oils work effectively against all scale life stages and provide excellent control when properly timed and applied.

Dormant oils applied during late winter or early spring target overwintering scales before crawler emergence. These heavy oil applications penetrate scale coverings more effectively when plants are dormant, and temperatures remain cool. Apply dormant oils when temperatures are expected to stay above freezing for 24 hours after application.

Growing-season oil applications use lighter formulations that won’t damage active foliage while still providing effective scale control. These oils require thorough coverage and are most effective when applied during crawler emergence, when young scales lack protective coverings.

Insecticidal soap targets crawlers and soft-bodied scale stages effectively while remaining relatively safe for beneficial insects. Soap products work by disrupting scale cell membranes and require direct contact for effectiveness. Multiple applications at weekly intervals may be necessary to catch emerging crawlers.

Systemic insecticides, particularly neonicotinoids, provide long-term scale control by being absorbed into plant tissues and affecting scale insects when they feed. These products are effective against established infestations but may take several weeks to reach full effectiveness.

Products containing imidacloprid control soft scales and certain other scale species, but are ineffective against armored scales or the cottony cushion scale. Understanding these limitations helps select appropriate products for specific scale problems.

Insect growth regulators containing pyriproxyfen target the crawler stage by preventing normal development and reproduction. These products stop crawlers from maturing into reproductive adults and reduce egg production in treated scales.

Contact insecticides require precise timing relative to crawler emergence for maximum effectiveness, as mature scales remain protected beneath their coverings. Monitor for crawler activity and apply contact sprays during peak emergence periods for best results.

Prevention Strategies

Quarantine procedures for new plants entering homes or gardens prevent the introduction of scale insects from contaminated plant sources. Inspect all new plants carefully and isolate them for several weeks before placing them near established plant collections.

During quarantine periods, monitor new plants closely for any signs of scale development. Many scale infestations come from newly purchased plants that appeared healthy at the time of purchase but carried eggs or young scales that weren’t immediately visible.

Regular plant health monitoring and early intervention prevent minor scale problems from developing into severe infestations. Establish routine inspection schedules and respond quickly to any suspicious plant changes or visible scales.

Avoiding plant stress through proper watering and fertilization maintains plant vigor and resistance to scale establishment. Stressed plants become more susceptible to scale infestations and suffer greater damage when scales establish.

Water plants appropriately for their species and environmental conditions, avoiding both drought stress and overwatering. Maintain proper fertilization programs without over-fertilizing, which can promote soft, succulent growth that attracts scales.

garden filled with healthy plants, showcasing proper spacing and care, with lush green leaves and well-maintained soil

Selecting resistant plant varieties when available provides long-term scale prevention for new plantings. Some plant cultivars show natural resistance to specific scale species, though complete immunity remains rare.

Research plant selections for known scale susceptibility before purchasing, especially for areas with a history of scale problems. Extension service publications often provide information on plant resistance and susceptibility to local-scale species.

Maintaining clean gardening tools prevents scale dispersal between plants and garden areas. Disinfect pruning tools between plants, especially when working on known-susceptible species or in previously infested areas.

Understanding scale-dispersal methods helps prevent accidental spread via wind, animals, and contaminated tools. Crawlers can be carried considerable distances by wind currents, while birds and other animals can transport scales between plants on their bodies.

When to Seek Professional Help

Extensive infestations covering multiple plants or large trees often exceed the capability of homeowner treatment methods and require professional expertise and equipment. Professional applicators have access to more effective products and application techniques that aren’t available to consumers.

Large trees infested with scales may require specialized equipment to ensure proper treatment coverage, including hydraulic sprayers and boom trucks capable of reaching entire tree canopies. Professional arborists understand proper timing and techniques for treating different-scale species across various tree species.

Difficulty identifying scale species for targeted treatment suggests the need for professional diagnosis and treatment recommendations. Accurate identification determines appropriate control strategies, as different scale species respond differently to various treatment approaches.

Professional entomologists and extension specialists can provide species identification services through submitted samples, often available through county extension offices or university diagnostic laboratories. Proper identification ensures that selected control methods will be effective against the specific scale species present.

Repeated treatment failures with home remedies indicate the need for professional assessment and intervention. Persistent scale problems may result from incorrect species identification, improper treatment timing, or ineffective products.

High-value ornamental plants requiring specialized care benefit from professional treatment that minimizes plant stress while maximizing scale control effectiveness. Mature landscape trees, rare plants, or valuable ornamental specimens justify professional treatment costs through plant preservation.

Professional treatment options often include systemic insecticides that require specialized application techniques and licensing for use. These products may provide longer-lasting control than consumer products but require professional expertise for safe and practical application.

County extension offices provide local expertise and can recommend certified arborists or pest control professionals experienced with scale insects. Extension agents understand local-scale species and can provide region-specific control recommendations.

Contact information for certified arborists is available through professional organizations like the International Society of Arboriculture, which maintains directories of certified professionals. Look for arborists with specific experience in scale insect management and integrated pest management approaches.

Professional pest control companies specializing in ornamental plant care offer ongoing monitoring and treatment services that maintain scale control over multiple seasons. These services often prove more cost-effective than repeated individual treatments for severe or recurring infestations.

Scale insects on plants present complex identification and control challenges that require patience, persistence, and often professional expertise. Early detection and prompt intervention remain the keys to successful scale management, whether dealing with indoor plants or extensive outdoor landscapes. By understanding the various scale types, their life cycles, and appropriate control methods, plant owners can develop effective strategies for maintaining healthy, scale-free plants throughout the growing season.

Todd’s Marietta Tree Services

Marietta, GA
(678) 505-0266

Originally published on: https://www.toddsmariettatreeservices.com/scale-insects-on-plants/

Wednesday, June 4, 2025

Bark vs Mulch – Best Use for Your Yard

When it comes to choosing between bark vs mulch for your yard or garden, the decision can significantly affect its health and appearance. Both bark and mulch have their unique benefits and drawbacks. Bark, derived from the outer layer of trees, is known for its durability and visual appeal. Mulch, made from various organic materials, enriches the soil with nutrients. This toddsmariettatreeservices.com article explores the differences between bark and other types of mulch to help you choose the best option for your garden.

bark vs mulch

Key Takeaways

  • Bark mulch is derived from the outer layer of trees and is known for its durability, aesthetic appeal, and effective weed suppression. In contrast, other organic mulches offer nutrient enrichment and require more frequent replacement.
  • When choosing between bark and other mulches, factors such as cost, accessibility, and intended use should be considered to select the most suitable option for landscaping needs.
  • Proper application and maintenance techniques for both bark and organic mulches are essential to maximize their benefits in moisture retention, soil health, and visual appeal.

Understanding Bark and Mulch

When it comes to landscaping ground cover, bark and mulch are the primary options that most gardeners consider. Each has distinct characteristics and serves specific functions in the garden. Bark mulch is derived from the outer layer of trees, whereas mulch is a blend from the entire tree, leading to differences in structure and longevity. These differences can significantly affect your garden’s health and appearance, making the selection crucial for your garden’s needs.

Bark mulch is known for its durability and uniform texture, making it a popular choice for aesthetics and weed suppression. In contrast, other mulches, which include a mix of wood chips, leaves, grass clippings, and wood mulch, offer more nutrients but may require more frequent replacement. Additionally, mulch and bark can enhance the overall appearance of your garden.

Recognizing these key differences aids in making an informed choice and promoting a thriving garden.

What is Bark Mulch?

Bark mulch is produced by separating the wood bark from the tree trunk and grinding it into fragments. This type of mulch can be made from various trees, including cedar, pine, cypress, oak, and maple, each offering a unique visual appeal and texture. The primary uses of bark mulch include weed suppression, moisture retention, and enhancing the garden’s aesthetic appeal.

Bark mulch’s functional benefits and cost-effectiveness make it ideal for budget-conscious gardeners. It is best suited for landscape designs, walking paths, and garden beds, where its durability and aesthetic lifespan of up to two years can be fully appreciated.

Moreover, being biodegradable, bark mulch contributes to environmental sustainability, breaking down over time and enriching the soil.

What is Mulch?

Mulch is a protective layer made from various organic materials like wood chips, leaves, and grass clippings. Common components include pine straw needles, straw, shredded leaves, and compost, each contributing to how mulch is made to retain moisture, suppress weeds, and regulate soil temperature. These organic materials decompose over time, adding valuable nutrients to the soil and improving its structure.

Mulch retains moisture, suppresses weeds, and regulates soil temperature, making it a crucial component in any garden. Knowing how mulch functions helps gardeners appreciate its role in promoting plant growth and maintaining a healthy garden.

Visual Appeal and Types of Bark and Mulch

types of bark and mulch

Visual appeal plays a crucial role in landscaping, affecting the overall look and feel of garden spaces. Selecting the right type of mulch achieves the desired aesthetics and enhances garden appeal. Here are some options to consider:

  • Bark mulch offers a uniform texture and various color options that enhance the natural beauty of landscaped areas.
  • Other organic mulches like wood chips come in diverse colors and textures, catering to different landscaping needs.
  • Rubber mulch is another alternative that provides a unique look and durability.

By choosing the right mulch, you can significantly improve the visual appeal of your garden.

Exploring the appearances of bark mulch and other mulches helps you understand their contributions to your garden’s visual appeal. Whether you prefer the natural look of bark mulch or the varied textures of other mulches, knowing your options allows you to create a landscape that is both beautiful and functional.

Appearance of Bark Mulch

Bark mulch is highly regarded for its natural appearance and visual appeal. It typically exhibits a uniform texture, which contrasts with the diverse textures of other types of mulch. The color of bark mulch varies by tree species, ranging from deep browns to reds, adding a rich, earthy tone to the garden. Pine bark mulch, for instance, can vary from reddish-brown to dark brown, with a chunkier texture that adds visual interest. Hardwood bark mulch is another excellent option that complements various landscapes.

The aesthetic of bark mulch is influenced by the texture of tree bark and the colors associated with different tree species. This mulch serves a decorative purpose, enhancing the landscape while providing functionality. Its coarse, chunky texture and rich colors create a visually appealing ground cover that complements the natural beauty of plants and trees.

Appearance of Other Mulches

Other mulches, especially organic ones, present a natural appearance with earthy tones, and their color varies depending on the source material used. Wood chips provide a natural look that complements gardens, while rubber mulch is available in bright colors, adding a modern touch to landscaping. These different colors and textures cater to various landscaping endeavors, enhancing both beauty and functionality.

Organic mulches like shredded leaves, grass clippings, and pine needles not only enrich the soil but also contribute to the garden’s aesthetic appeal. The varied textures and colors of these mulches allow gardeners to create visually diverse landscapes that stand out while supporting plant health and growth.

Benefits of Using Bark Mulch

Bark mulch is often chosen for its natural aesthetic and resilience in landscaping. It provides robust characteristics that enhance the landscape, effectively suppressing weeds and retaining soil moisture, which promotes healthier plant roots. Bark mulch also insulates against temperature changes, providing further benefits in maintaining plant health.

Examining the specific benefits of bark mulch provides insights into how it can enhance your garden’s health and appearance. From weed suppression to moisture retention and durability, bark mulch offers multiple advantages that make it a preferred choice for many gardeners.

Weed Suppression and Moisture Retention

garden bark weed suppression

In gardening, bark mulch primarily serves for weed suppression and moisture retention. It effectively blocks sunlight, which limits weed growth and simplifies maintenance. By forming a natural barrier, bark mulch deters weeds and reduces the need for manual removal, creating a more manageable garden environment.

In addition to weed suppression, bark mulch helps keep moisture in the soil and prevents water wastage by reducing evaporation. Its excellent moisture retention slows down decomposition, keeping your plants hydrated during hot summer months.

This combination of weed control and moisture retention makes bark mulch invaluable in any garden, especially when considering the prevention of weed seeds.

Durability and Soil Insulation

Bark mulch is able to withstand diverse climatic conditions over extended periods, making it more durable than finer organic mulches due to its resilience and slow decay. This durability ensures that bark mulch provides long-term benefits, requiring less frequent replacement compared to other mulches.

Moreover, bark mulch offers excellent protection against temperature fluctuations, maintaining optimal conditions for plant roots. When applied at the recommended depth, it significantly improves soil insulation, stabilizing soil moisture and reducing soil temperature extremes. This insulation is crucial for enhancing plant growth and maintaining a healthy garden environment.

Benefits of Using Other Mulches

Various types of mulch are cost-effective and versatile options for gardeners due to their availability and affordability. Organic mulches can significantly improve soil structure and drainage as they decompose, adding beneficial organic materials to the soil. Mulch also reduces evaporation and keeps the soil moist, which is essential for plant growth.

Exploring the benefits of other mulches reveals their versatility, cost-effectiveness, soil enrichment, and erosion control. Knowing these benefits helps gardeners make informed decisions about the best type of mulch for their needs.

Soil Enrichment and Erosion Control

Organic mulches, such as grass clippings and leaves, enhance soil health as they decompose, enriching the soil with organic matter and nutrients. This enrichment improves soil quality, supporting healthier plant growth. Additionally, mulch prevents soil erosion by acting as a protective barrier against rain impact.

Vegetable gardens particularly benefit from using mulch because it aids in moisture retention and reduces weed growth. Incorporating organic mulches enhances soil health and sustainability while preventing erosion in vegetables.

Versatility and Cost-Effectiveness

Different mulches can meet various gardening and landscaping needs due to their versatility. Here are some types of mulch:

  • Hardwood mulch typically lasts up to two years, making it a cost-effective option for long-term use in gardens.
  • Straw mulch is often chosen for its lightweight nature and excellent insulating properties.
  • Premium mulch blends include small to medium bark and hardwood pieces, offering both visual appeal and practical benefits for your garden.

These options can help you choose the right mulch for your landscaping and gardening projects.

The versatility and cost-effectiveness of these mulches make them suitable for a wide range of applications, from flower beds to vegetable gardens. By choosing the right mulch, gardeners can achieve their desired aesthetic while maintaining a healthy, sustainable garden.

Choosing Between Bark Mulch and Other Mulches

side-by-side comparison of bark mulch

Different types of mulch serve various landscaping needs, like using straw for moisture retention in vegetable patches. Organic mulches are generally more affordable initially but require periodic replenishment due to decomposition. Applying mulch should ensure a 2 to 4-inch thickness for optimal moisture retention and weed control.

This section guides readers through the decision-making process by discussing key factors and the best applications for each type of mulch. Evaluating cost, accessibility, and visual style helps gardeners make an informed choice that suits their needs.

Factors to Consider

When choosing between bark and other mulches, factors such as expense, accessibility, and visual style play a crucial role. Bark mulch is generally more expensive due to the specialized machinery required for its production. However, its durability and aesthetic appeal often justify the higher cost.

Accessibility of materials can significantly affect the decision between using mulch or bark in gardening. Cost is also a critical factor, as it can influence the overall gardening budget. By considering these factors, gardeners can select the mulch that best fits their needs and preferences.

Best Applications for Bark Mulch

Bark mulch is particularly effective in landscaped areas that experience foot traffic due to its durability. Its ability to resist wear from foot traffic makes it suitable for high-traffic areas like pathways and garden beds, where it can maintain its appearance and functionality over time.

Best Applications for Other Mulches

In regions with high temperatures, straw mulch is preferable due to its affordability and nutrient benefits. Other mulches, such as grass clippings and shredded leaves, are suitable for vegetable gardens as they allow easier soil turnover and provide essential nutrients as they decompose.

Application and Maintenance Tips

applying mulch to a garden and yard landscape

To maximize the benefits of mulch, it’s important to apply and maintain it properly. Whether you’re using bark mulch or another type, following correct application techniques ensures optimal weed suppression, moisture retention, and soil health. Regular maintenance—such as refreshing or replacing mulch—helps preserve its effectiveness and visual appeal.

This section offers practical advice on how to apply and maintain both bark mulch and other types of mulch. Following these tips ensures mulch continues to support a healthy and beautiful garden.

How to Apply Bark Mulch

Clear the area of weeds and debris before applying bark mulch. Once the area is prepared, lay down a layer of bark mulch that is 2 to 4 inches thick, ensuring that it surrounds but does not touch the plant stems.

One cubic yard of bark mulch covers about 162 square feet at a 2-inch thickness. It covers approximately 108 square feet when applied at a thickness of 3 inches.

Bark mulch effectively controls weeds and retains moisture in garden beds. These steps ensure correct bark mulch application, maximizing benefits for plants and the landscape.

How to Apply Other Mulches

When applying other types of mulch, such as wood chips or straw, it is essential to remove any weeds and level the soil surface to create a stable base. Different mulches can be layered to combine their benefits; for instance, a base of coarse mulch can support finer materials on top. Rubber mulch should be spread evenly to avoid clumping.

Organic mulches decompose faster, requiring more frequent replenishment than inorganic types. These application techniques ensure mulch remains effective and visually appealing, utilizing organic material to enhance soil health.

Replacing and Refreshing Mulch

Organic mulch typically requires replacement every one to two years, depending on the size of the mulch pieces used. Signs such as fading color, weed growth, or pest presence indicate that mulch should be refreshed or replaced. Adding a new layer of mulch can rejuvenate its appearance and prevent weed growth effectively.

Inorganic mulches, like rubber mulch, can last longer but should still be checked annually for any signs of wear or decomposition. Regular checks and timely replacements maintain mulch’s protective and aesthetic benefits.

Bark vs Mulch Summary

Choosing between bark mulch and other types of mulch depends on various factors, including cost, accessibility, visual appeal, and specific gardening needs. Bark mulch offers durability, weed suppression, and moisture retention, making it ideal for high-traffic areas and long-term use. Other mulches provide versatility, cost-effectiveness, and soil enrichment, making them suitable for various gardening and landscaping projects.

By understanding the differences, benefits, and best applications of each type of mulch, gardeners can make informed decisions that enhance their garden’s health and beauty. Whether you opt for the robust characteristics of bark mulch or the diverse benefits of other mulches, the key is to choose the option that best fits your specific needs and preferences. Happy gardening!

Bark and Mulch Frequently Asked Questions

What are the primary benefits of using bark mulch?

The primary benefits of using bark mulch include its durability, effective weed suppression, moisture retention, and natural aesthetic appeal, making it an excellent choice for sustained garden health and appearance. Its slow decay further ensures long-term advantages, especially in high-traffic areas.

How often should mulch be replaced or refreshed?

Mulch should typically be replaced every one to two years for organic types and every three to five years for inorganic types. If you notice fading color, weed growth, or pests, it is time to refresh or replace the mulch.

What factors should I consider when choosing between bark mulch and other types of mulch?

When choosing between bark mulch and other types of mulch, consider cost, accessibility, visual appeal, and your specific gardening needs. Bark mulch provides durability and aesthetics, whereas other options can be more versatile and budget-friendly.

Can I layer different types of mulch for better results?

Layering different types of mulch is indeed beneficial, as it allows you to combine their advantages, such as enhanced moisture retention and improved weed suppression. Using a base of coarse mulch beneath finer materials can optimize these effects.

What is the recommended thickness for applying mulch?

For effective moisture retention and weed control, it is recommended to apply mulch at a thickness of 2 to 4 inches. This range provides optimal coverage and benefits.

Todd’s Marietta Tree Services

Marietta, GA
(678) 505-0266

Originally published on: https://www.toddsmariettatreeservices.com/bark-vs-mulch-best-use-for-your-yard/

Monday, April 28, 2025

Apple Scab Explained

Apple scab is a fungal disease that affects apple trees, leading to defoliation and reduced fruit quality. Managing this disease is crucial for maintaining healthy trees and high-quality fruit. In this article, we will explore the causes, symptoms, lifecycle, and effective management strategies for apple scab.

apple scab fungal tree disease

Key Takeaways

  • Apple scab, caused by the fungus Venturia inaequalis, weakens trees and affects fruit quality, making early recognition of symptoms crucial for control.
  • Effective management of apple scab includes sanitation practices, selecting resistant cultivars, proper planting techniques, and timely fungicide applications.
  • Understanding the lifecycle and environmental conditions that favor apple scab helps predict outbreaks and implement timely interventions.

Understanding Apple Scab

Apple scab is a fungal disease caused by the fungus Venturia inaequalis. While apple scab isn’t fatal, it can severely weaken trees by causing defoliation, which in turn increases their vulnerability to other diseases and pests. The presence of apple scab reduces the quality and size of the fruit, making it less marketable and desirable. In severe cases, the disease can lead to total crop failure, impacting both commercial growers and home gardeners alike.

The typical scab lesions on leaves and fruit are not just unsightly; they can cause significant damage. Unchecked defoliation leads to increased susceptibility to other diseases and pests, creating a vicious cycle of declining tree health. Gaining insight into this apple disease equips you to manage and control apple scab more effectively in your orchard.

Recognizing Symptoms of Apple Scab

The first signs of apple scab on leaves are often overlooked. Dull, olive-green areas appear on the undersides of leaves, usually near the buds. These initial symptoms can be subtle, but they quickly progress. As the infection advances, the olive-green spots become more pronounced, turning into dark, velvety brown spots that can eventually turn brown and corky. As the lesions develop, including pinpoint scabs and leaf spots, they can cause the leaves to yellow, twist, and eventually fall off prematurely.

infected fruit showing symptoms of apple scab, including brown spots

On the fruit, apple scab manifests as dark, velvety lesions that can distort the fruit and cause cracking. Infected fruit often drops prematurely, reducing the overall yield. The lesions can also lead to sunken, tan scars that might develop velvety spores on the fruit surface. Early recognition of these symptoms is crucial for effectively controlling and managing the disease.

Recognizing symptoms on both leaves and fruit enables timely intervention. Whether you’re a commercial grower or a home gardener, knowing what to look for allows you to take action before the disease can cause significant damage. Effective scab control starts with accurate identification and early management after the early phases of growing your apple tree.

Lifecycle of the Apple Scab Fungus

The apple scab fungus overwinters on fallen leaves and infected twigs. As spring arrives, the fungus survives winter in leaf litter from infected trees. During wet conditions, ascospores are released from pseudothecia, aiding their dispersal to host plants. These mature ascospores peak from late pink through petal fall, marking critical apple scab infection periods.

Initial infections usually manifest in mid-spring and continue until the autumn leaf fall. After the early infection, a secondary infection can produce asexual spores called conidia, leading to multiple infection cycles within the same growing season. Both ascospores and conidia require a period of wetness to germinate and establish new infections on host plants during the infection period, contributing to the disease cycle in early spring.

Knowing the lifecycle of the apple scab fungus aids in effective management. Knowing when and how the fungus spreads allows for timely interventions to control apple scab and protect your trees from severe damage.

Conditions Favoring Apple Scab Infection

environmental conditions for apple scab infection, including wet leaves and humidity

Apple scab thrives in specific environmental conditions. The development of apple scab is encouraged by extended wet and humid conditions that typically occur from late April to June. Cool and damp spring weather is particularly conducive to apple scab outbreaks. Higher humidity levels significantly contribute to the intensity of apple scab infections.

Infection by apple scab is triggered when spores come into contact with wet leaf surfaces. A six to eight-hour moisture period is required for the spores to germinate and infect the leaves. Rainfall aids in the increased spore production and dispersal of the apple scab fungus. Monitoring moisture and temperature conditions can help predict outbreaks and ensure the timely application of fungicides.

Host Plants and Susceptibility

Apple scab affects various host plants, primarily apples, crabapples, mountain ash, hawthorn, and other Malus species. Common susceptible apple cultivars include Red Delicious, Rome Beauty, and Granny Smith, which face significant challenges due to their high susceptibility to scab. Varieties such as Jonagold, Melrose, and Spartan display intermediate resistance, while cultivars like Akane, Chehalis, Liberty, and Tydeman Red show good resistance to apple scab.

Severely infected apples and crabapple trees produce poor-quality fruit and suffer reduced health due to leaf loss. Young apple fruit is notably more susceptible to apple scab infections, while mature fruit has significantly lower susceptibility to Malus spp.

Understanding the susceptibility of different host plants and apple cultivars helps guide effective planting choices and management strategies for the apple scab fungus

Effective Management Strategies for Apple Scab

Effective management of apple scab requires an integrated approach that combines sanitation practices, selecting resistant cultivars, and proper planting techniques. These strategies can notably reduce the incidence and severity of apple scab in your orchard.

Sanitation Practices

removing leaf debris, raking fallen leaves

Sanitation practices help reduce or eliminate the primary inoculum, which can lead to apple scab infections. Removing fallen leaves in the fall can eliminate winter survival sites for the fungus. Pruning infected leaves and raking under trees are effective methods to manage apple scab.

Shredding leaf litter accelerates decomposition and reduces fungal spore survival. Destroying leaf debris from infected trees prevents the fungus from surviving through winter.

Mulching leaves can help reduce the buildup of pathogens that cause storage scab. Collecting and discarding fallen infected leaves improves airflow and assists in managing susceptible apple trees.

Selecting Resistant Cultivars

Choosing resistant cultivars is a key strategy for long-term apple scab management. Apples such as Akane, Chehalis, Liberty, Prima, and Tydeman Red demonstrate good resistance to apple scab. If your tree has had severe scab issues in the past, it’s wise to think about replacing it. Consider selecting a variety that is resistant to this problem.

This approach not only helps manage apple scab but also improves fruit quality and reduces the need for chemical treatments, making it a sustainable option for commercial and home gardeners.

Proper Planting Techniques

Effective planting techniques significantly aid in controlling apple scab. Adequate spacing of apple trees ensures better air movement, crucial in reducing moisture-related diseases. Effective management involves not only the removal of fallen leaves but also ensuring proper air circulation around the plants.

These practices help reduce leaf wetness and create an unfavorable environment for the apple scab fungus. By implementing proper planting techniques, you can enhance the overall health and productivity of your apple trees.

Fungicide Treatments for Apple Scab

Fungicide treatments are an essential part of managing apple scab. Recommended fungicides for controlling apple scab include captan, lime-sulfur, scab sprays, and powdered or wettable sulfur.

Fungicides prevent infections but cannot cure established diseases. They protect only healthy trees and are ineffective on diseased trees.

Protectant Fungicides

tree fungicide treatment for apple scab disease

Protectant fungicide sprays and cover sprays should be applied at critical growth stages, including the green tip and pink bud stages, and continued at regular intervals thereafter to effectively prevent initial infections. Fungicides work by creating a protective spray barrier on the plant, preventing fungal spores from causing infections on leaves and fruit.

Applying protectant fungicides at optimal times can significantly lower the risk of apple scab infections. Following label instructions and ensuring thorough coverage are essential for maximum effectiveness.

Post-Infection Fungicides

Post-infection fungicides should be used soon after wet weather to manage disease spread. These fungicides are applied to manage the spread of disease after initial infections occur. They can supplement a program of protectant sprays, providing an additional layer of control during infection periods.

Prompt use of post-infection fungicides after wet conditions helps control new infections and prevents further spread, allowing the plants to remain healthy. This approach is particularly useful during periods of high disease pressure.

Monitoring and Timing for Effective Control

Effective control of apple scab relies heavily on precise monitoring and timing. Apple scab is more prevalent during cool, wet spring weather, with high rainfall and relative humidity contributing to infection cycles. Regular checks for scab lesions should be performed on the upper and lower surfaces of leaves, throughout the canopy, to monitor infection levels effectively.

Fungicide applications should start around the green tip stage of apple growth and continue every 7 to 14 days until wet weather subsides for maximum control. Post-infection fungicides can be effective shortly after wet conditions and can supplement a program of protectant sprays.

Addressing Storage Scab

Storage scab develops from infections in the orchard shortly before harvest. Active leaf infection just before harvest can infect fruit, leading to storage scab. This can significantly impact the quality and marketability of stored fruit.

To prevent storage scab, growers should manage leaf infections and apply fungicides shortly before harvest. Proper sanitation and diligent monitoring also help reduce the risk.

Preventing Fungicide Resistance

Preventing fungicide resistance is vital to maintaining effective apple scab control. Rotating active ingredients of fungicides is recommended to minimize the risk of developing resistance. Employing multiple active ingredients in fungicides ensures effective control and reduces the chance of resistance development.

Employing multi-site fungicides lowers the risk of developing resistant strains of the fungus responsible for storage scab. Limiting the use of high-risk fungicides in a control program for apple scab is also advisable.

Apple Scab Summary

apple tree blossom

Effectively managing apple scab requires a comprehensive approach that includes understanding the disease, recognizing its symptoms, and implementing integrated management strategies. Combining sanitation practices, selecting resistant cultivars, and using proper planting techniques can significantly reduce the incidence and severity of apple scab. Fungicide treatments, both protectant and post-infection, play a crucial role in controlling the disease. Monitoring and timing are key to ensuring the effectiveness of these interventions.

Preventing fungicide resistance through the rotation of active ingredients and employing multi-site fungicides is essential for long-term control. By following these guidelines, you can keep your apple trees healthy and productive, ensuring a bountiful harvest. Stay vigilant and proactive in managing apple scab, and your efforts will be rewarded with high-quality fruit and robust trees.

Apple Scab Frequently Asked Questions

What causes apple scab?

Apple scab is caused by a fungus called Venturia inaequalis, which survives winter on fallen leaves and infected branches. Proper sanitation and management practices can help control its spread.

How can I recognize the symptoms of apple scab?

You can recognize apple scab by looking for dull, olive-green spots on the undersides of leaves that develop into dark, velvety lesions. Similar dark lesions may appear on the fruit, often causing distortion and cracking.

What environmental conditions favor apple scab infection?

Apple scab infection is favored by extended wet and humid conditions, particularly during cool and damp spring weather. Managing these environmental factors is crucial for preventing the disease.

What are some effective management strategies for apple scab?

To effectively manage apple scab, utilize sanitation practices, select resistant varieties, implement proper planting techniques, and consider fungicide treatments. Each of these strategies can significantly reduce the risk of infection and promote healthier apple production.

How can I prevent fungicide resistance in managing apple scab?

To prevent fungicide resistance in managing apple scab, rotate fungicide active ingredients, use multiple active ingredients, and incorporate multi-site fungicides into your strategy. This approach not only enhances effectiveness but also reduces the risk of resistance development.

Todd’s Marietta Tree Services

Marietta, GA
(678) 505-0266

Originally published on: https://www.toddsmariettatreeservices.com/apple-scab-explained/

Wednesday, January 29, 2025

What to Plant After Tree Removal

What to plant after tree removal? This question is often asked, and this guide covers the best trees, shrubs, and perennials for your garden. It also includes soil preparation tips to help new plants thrive.

what to plant after tree removal

Key Takeaways

  • Selecting the right trees, shrubs, and plants is crucial for successful replanting after tree removal, with options like maple, dogwood, and pine trees being recommended.
  • Proper soil preparation, such as clearing debris and assessing conditions, is essential for creating a healthy environment for new plantings.
  • Consulting certified arborists provide expert guidance on tree selection and care, ensuring optimal growth and landscape health post-removal.

Best Trees to Plant After Tree Removal

Choosing the right trees is key to ensuring they thrive in their new environment. Assess the soil condition, climate adaptability, and benefits such as shade and wildlife habitat.

trees suitable for planting after tree removal

Three excellent tree options for replanting include maple, dogwood, and pine trees.

Maple Trees

Maple trees are a fantastic choice for replanting after tree removal due to their adaptability to various soil conditions and stunning fall colors. Japanese Maple trees, in particular, provide good shade and a distinctive ornamental appearance, making them a favorite for many gardeners.

Dogwood Trees

Dogwood trees, known for their beautiful spring flowers and adaptability to different soil types, are a versatile choice. Their vibrant blooms can significantly enhance your garden’s aesthetic appeal.

Pine Trees

Pine trees provide year-round greenery and are highly drought-tolerant, making them a resilient choice for areas with water scarcity. Their unique structure and foliage add to the garden’s aesthetics and ecological balance.

Ideal Shrubs for Post-Tree Removal Planting

ideal shrubs to plant after tree removal

Shrubs enhance the aesthetics and structure of a garden after tree removal, filling the space with color, texture, and fragrance.

Some of the best shrubs to consider after tree removal include hydrangeas, azaleas, and roses, known for their beautiful blooms and adaptability to various soil conditions.

Hydrangeas

Hydrangeas, thriving in partial shade, can bring vibrant colors to formerly shaded areas. Their large, colorful blooms significantly enhance the garden’s aesthetic, making them a popular choice after tree removal.

Azaleas

With their evergreen foliage and vibrant spring flowers, Azaleas add year-round interest to your garden. They thrive in acidic soils and provide a burst of spring color.

Roses

Roses, cherished for their fragrance, beauty, and elegance, flourish in sunny areas, making them ideal for spots where trees were removed.

With a wide variety of colors and types, roses add a touch of classic beauty to any garden.

Perennials and Annuals to Consider

Perennials and annuals bring vibrant seasonal color to your garden after tree removal, filling in gaps and providing continuous blooms throughout the season.

daylilies, perennials, and annuals plants

Some hardy perennials and bright annuals that thrive in various conditions include daylilies, hostas, and marigolds.

Daylilies

Daylilies, low-maintenance perennials, thrive in various conditions. Blooming in numerous colors, they adapt well to different soil types, making them versatile for any garden.

Hostas

Hostas, shade-tolerant perennials, are ideal for areas with old tree roots. They thrive in shaded conditions and utilize spaces that are otherwise difficult to plant.

Marigolds

Marigolds, beneficial annuals that deter pests with their unique aroma, are strategic for gardens. They offer vibrant colors and thrive in well-drained soil and full sunlight, enhancing your garden’s visual appeal.

Preparing the Soil After Tree Removal

preparing soil for new plants after tree removal

Properly preparing the soil is crucial for new plantings’ success after tree removal. This includes removing any remaining wood chips, assessing soil conditions, and enriching the soil as needed to create a healthy environment.

These steps will help your new trees, shrubs, and plants thrive.

Clear Wood Chips

After cutting down a tree, the tree removal process includes removing wood chips and any remaining roots from the same tree to prevent regrowth and competition for nutrients with new plants.

Disposing of or repurposing these materials as mulch helps maintain a clean planting area.

Assess Soil Conditions

Conduct a soil test to identify pH levels and nutrient content before replanting. This will guide you in making the necessary adjustments for optimal soil conditions.

Amend Soil

Incorporating organic matter like compost or manure enhances soil fertility and structure. Adding compost supplies the soil with essential nutrients, improves drainage, and supports beneficial microbial life, creating a healthy environment for new plants.

Planting Grass After Stump Grinding

planting grass after stump grinding

Planting grass after stump grinding requires careful preparation and timing. Ideally, wait about a year to allow the soil to cure properly.

Follow these steps to ensure a lush, green lawn: remove sawdust, sprinkle grass seed, and water regularly.

Remove Sawdust

Clearing away sawdust and wood particles prevents nitrogen depletion in the soil after tree removal. Ensure all debris is removed to promote healthy soil conditions for new grass.

Sprinkle Grass Seed

After clearing the area, sprinkle grass seeds evenly and water regularly to promote healthy germination and growth.

Water Regularly

Newly planted grass seeds require consistent watering, especially during their initial growth phase, to ensure proper germination and establishment. Applying organic mulch around the seeded area helps retain soil moisture, which is essential for grass seed growth.

Maintenance Tips for Newly Planted Trees

maintenance for newly planted trees

Maintaining newly planted trees is essential for their survival and growth. This involves regular watering, mulching, and protecting the trees from wildlife. Tree planting is a crucial step in ensuring their long-term health.

These tree planting tips will help your new trees establish strong roots and thrive.

Regular Watering

Newly planted trees need consistent watering to establish their root systems, especially during their initial growing season. Watering at least once a week is typically recommended for healthy growth.

Mulching

Using organic mulch around the base of new trees helps preserve soil moisture and stabilize temperature, encouraging healthy growth.

Wood chips or bark are recommended for organic mulch.

Protect from Wildlife

Young trees may need protection from animals. Using a fence or barrier can effectively safeguard them from wildlife like deer.

Creative Uses for Old Tree Stumps

decorative flower beds in an old tree stump

Old tree stumps can be creatively repurposed to enhance your garden’s aesthetic. Explore innovative ideas like creating raised flower beds and decorative elements, turning a potential problem into a charming feature.

Raised Flower Beds

Creating a raised flower bed from a stump involves hollowing out the top and planting seasonal flowers or herbs. This enhances your garden’s aesthetics and provides a defined planting area.

Decorative Elements

Stumps can be transformed into whimsical structures like fairy houses or gnome homes, adding character and charm to your tree stump garden.

Consult Certified Arborists for Expert Advice

Consulting a certified arborist provides professional guidance on tree care and planting. Arborists recommend suitable trees, assist with maintenance, and offer expert advice on soil conditions and planting strategies, ensuring successful growth.

Tree Care Services

Certified arborists provide essential tree care services, including mulching and maintenance strategies. Their expertise ensures proper tree removal, planting, and care, enhancing soil health and moisture retention for new plants.

Soil and Plant Recommendations

Certified arborists help choose ideal locations for transplanting trees and suitable species based on soil conditions and climate. Consulting them ensures the selection of suitable plants after tree removal for a healthy and thriving landscape.

Planting After Tree Removal Summary

Replanting after tree removal offers a chance to renew your garden’s beauty and health. By selecting the right trees, shrubs, and plants, preparing the soil properly, and maintaining your new plantings, you can create a lush and vibrant landscape. Consulting certified arborists ensure that you have expert guidance every step of the way.

Frequently Asked Questions

What are the best trees to plant after tree removal?

Maple, dogwood, and pine trees are the best options to plant after tree removal, as they offer both adaptability and aesthetic appeal. Consider these species for a successful replanting.

How should I prepare the soil after tree removal?

To prepare the soil after tree removal, it is essential to remove wood chips and debris, conduct soil testing, and amend the soil with organic matter such as compost or manure to improve its fertility and structure. This ensures a healthy foundation for future planting.

Can I plant grass immediately after stump grinding?

It is advisable to wait about a year after stump grinding before planting grass to allow the soil to cure properly. Removing sawdust and wood particles and regular watering will enhance grass growth when you do plant.

How do I protect newly planted trees from wildlife?

When protecting newly planted trees from wildlife, using barriers or fencing that can effectively shield them from animals like deer is essential. Implementing these measures will help ensure the trees can thrive without interference.

What are some creative uses for old tree stumps?

Old tree stumps can be creatively transformed into raised flower beds or whimsical decorations such as fairy houses or gnome homes, enhancing the charm of your garden. This repurposing adds both beauty and functionality to your outdoor space.

Todd’s Marietta Tree Services

Marietta, GA
(678) 505-0266

Originally published on: https://www.toddsmariettatreeservices.com/what-to-plant-after-tree-removal/

Wednesday, December 25, 2024

Managing Plant Rust Disease

Rust disease is a fungal infection that damages plant leaves, stems, and more. This toddsmariettatreeservices.com guide will help you identify, manage, and prevent rust disease in your garden.

rust disease

Key Takeaways

  • Early identification and prevention of rust disease are essential for effective management, including using rust-resistant plant varieties and maintaining proper watering techniques.
  • Non-chemical methods, such as good garden hygiene, proper irrigation, and crop rotation, are highly recommended to reduce the risk of rust infections.
  • While fungicides may be necessary for high-value plants with a history of rust, they should be applied early in the growing season and used minimally to avoid negative impacts on biodiversity and soil health.

Effective Management of Rust Disease in Your Garden

Effective management of rust disease begins with early identification and prevention. Rust fungi, belonging to the order Pucciniales, are specialized plant pathogens known for causing significant diseases. These infections thrive in moist weather with moderate temperatures and require moisture on leaf surfaces for growth. Inspecting plants closely before purchase, especially the inner and lower leaves, helps to avoid introducing rust.

Using rust-resistant plants is a highly effective strategy to combat rust infections. Although these plants are available for some annual and perennial varieties, their resistance can diminish over time. Additionally, proper watering techniques play a significant role in preventing rust. The risk of infection can be minimized by watering plants at their base rather than on the leaves. Severely infected plants should be replaced with more resistant varieties or alternatives from different plant families.

In some cases, the use of fungicides is necessary, especially for high-value plants with a history of severe infections. However, fungicides should be applied early in the growing season to healthy foliage before any infection occurs. Once rust is visibly present on most leaves, it is generally too late for fungicides to be effective. Fungicides are generally unnecessary for home gardens and should be reserved for high-value plants.

Rust Disease Background

garden showing plant affected by rust disease

Rust disease is a formidable foe for many gardeners. This common fungal pathogen primarily affects plant leaves but can extend its reach to stems, flowers, and fruit. Leaf rust hinders plant growth, leading to reduced yields and weakened plants. Understanding the life cycle of rust fungi and its different stages is essential for effective management.

Non-chemical methods for managing rust diseases are highly recommended. Crucial steps include selecting rust-resistant cultivars, ensuring adequate irrigation, and practicing proper cultivation techniques. Maintaining good garden hygiene—such as removing infected leaves, watering early in the day, and promoting air circulation—can also significantly reduce the risk of rust infections.

Understanding Rust Disease

Rust fungi, belonging to the order Pucciniales, are specialized fungal pathogens known for causing significant diseases. These fungi require living plants to complete their life cycle and exhibit diverse life cycles, often with multiple spore types. Rust infections thrive in moist weather with moderate temperatures and require moisture on leaf surfaces for growth.

Minimizing rust involves watering plants at their base rather than on the leaves. Rust-resistant plants are available for annual and perennial varieties, but resistance can diminish over time. Inspecting plants closely before purchase, especially the inner and lower leaves, helps to avoid introducing rust. Severely infected plants should be replaced with more resistant varieties or alternatives from different plant families.

Apply fungicides to healthy foliage early in the growing season before any infection occurs. Once rust is visibly present on a majority of leaves, it is generally too late for fungicides to be effective. Fungicides are typically unnecessary for home gardens and should be reserved for high-value plants with a history of severe infections.

Identifying Symptoms of Rust Infections

symptoms of rust infections on various plants

Early identification of rust infections is key to effective management. Rust infections often create pale spots on leaves that develop into spore-producing pustules. These pustules are typically found on the lower leaf surface and can produce a high quantity of microscopic spores. The color of rust pustules can vary, including shades of orange, yellow, brown, and black.

In cases of severe rust infection, leaves may turn yellow and drop off prematurely. Heavy rust infections can diminish a plant’s vigor and, in extreme cases, lead to death.

Rust fungi thrive in moist weather with moderate temperatures and require moisture on leaf surfaces for growth. Maintaining proper garden hygiene and regularly monitoring plant health are crucial.

Common Host Plants

Rust diseases can infect a wide variety of plants, including annual and perennial flowering plants, as well as ornamental grasses. Some common host plants for rust diseases include allium, antirrhinum, bluebell, box, chrysanthemum, fuchsia, heuchera, hypericum, lawn grasses, mahonia, pear, pelargonium, poplar, rose, and vinca.

Perennial ryegrass and Kentucky bluegrass are turfgrass species particularly susceptible to rust diseases. Knowing which plants are most vulnerable can help you take preventive measures to protect them from rust infections.

Life Cycle of Rust Fungi

The life cycle of rust fungi is characterized by their dependency on living plants to complete their development. These fungi exhibit diverse life cycles, often with multiple spore types. Managing infections and preventing disease spread requires understanding the life cycle of rust fungi.

Rust fungi have five distinct spore stages: teliospores, basidiospores, pycniospores, aeciospores, and urediniospores. Some rust fungi exhibit a heteroecious life cycle, requiring two different host plants to complete their development. Understanding the entire life cycle of rust fungi is necessary to develop effective management strategies due to their complex nature.

life cycle of rust fungi

Knowledge of the different spore stages and how rust fungi spread enables gardeners to better anticipate and prevent rust infections. This knowledge is particularly useful for implementing timely and targeted control measures.

Cultural Control Methods

Cultural control methods are vital for preventing rust diseases without the use of chemicals. Here are some effective strategies:

  1. Selecting rust-resistant plant varieties can significantly decrease the likelihood of infections.
  2. Drip irrigation helps minimize leaf wetness, reducing the likelihood of rust infection.
  3. Reducing moisture on foliage can be achieved by avoiding overhead watering.

By implementing these methods, you can effectively manage rust diseases in your garden.

Adequate plant spacing improves airflow and minimizes the risk of rust transmission between plants. Disease control starts with effective planting, proper watering, and sanitation practices. These cultural methods play a critical role in maintaining a healthy garden and preventing rust diseases.

Chemical Control Options

Chemical control options, such as fungicides, should be used only for high-value plants with a history of severe infection that cannot be replaced. Fungicides are typically used in the turf when newly seeded grass shows symptoms in high-visibility settings. Daconil® fungicides serve as preventive treatments against rust and over 65 other fungal diseases.

Contact fungicides do not penetrate plant surfaces and must be applied to the surface. Effective strategies for managing rust diseases include planting resistant varieties and cleaning up diseased debris. If chemical controls are used for rust diseases, apply them minimally and in a highly targeted manner.

Specific Rust Diseases

Hollyhock rust is a rust fungus that specifically infects hollyhocks, displaying symptoms like orange-brown spots on their leaves and stems. Cedar apple rust primarily affects apple and cedar trees, causing yellow-orange spots on leaves.

Geranium rust is characterized by brown spots on the leaves of geranium plants, leading to leaf drop. Understanding the specific symptoms and impacts of these rust diseases can help gardeners identify and manage them effectively.

Preventing Rust Infections

Preventing rust infections requires regular garden maintenance and good hygiene practices. During the growing season, promptly remove and discard any foliage or plants affected by rust. At the end of the gardening season, remove and properly dispose of all plant debris to limit spore survival.

remove and discard garden foliage

Preventive measures, such as ensuring proper air circulation and watering plants at their base instead of overhead, can significantly reduce the risk of rust infections. Keeping foliage dry by avoiding overhead watering is particularly effective in minimizing infection.

Ensure proper spacing between plants to enhance air circulation and minimize moisture retention.

Impact on Edible Crops

Rust diseases can severely impact agricultural productivity, affecting crops like wheat, coffee, and soybeans. These infections can reduce flower and crop yield and make plants more susceptible to pests, including various rust species. This is particularly concerning for home gardeners who rely on their gardens for fresh produce.

Unfortunately, no fungicides currently available effectively target rust diseases affecting edible crops for home gardeners. Therefore, non-chemical methods are the best approach for managing rust in edible crops.

Hyperparasites of Rust Fungi

Hyperparasites are organisms that parasitize other parasites, offering a natural means of controlling plant diseases, including rust fungi. Darluca species are notable hyperparasites that specifically target rust fungi, effectively reducing their populations in affected plants.

By promoting the presence of hyperparasites like Darluca species in the garden, gardeners may reduce dependency on chemical treatments for managing rust diseases. These hyperparasites can diminish the reproductive ability of rust fungi, thereby limiting the spread of rust diseases.

Safe Use and Disposal of Fungicides

The Royal Horticultural Society (RHS) advises against using fungicides due to their potential negative effects on biodiversity and soil health. The use of fungicides can lead to broader environmental issues, such as harming beneficial organisms in the ecosystem. It’s essential to read and follow guidelines for the responsible use, storage, and disposal of fungicides.

Homemade fungicides are discouraged as they lack regulation and testing. If you decide to use a fungicide, following all safety guidelines is crucial to minimize environmental impact.

Rust Disease Summary

Managing rust disease in your garden requires a combination of early identification, preventive measures, and, when necessary, the careful use of fungicides. Regular garden maintenance, good hygiene practices, and understanding the life cycle of rust fungi are all essential strategies for keeping your plants healthy.

By implementing these techniques and promoting natural control methods like hyperparasites, gardeners can effectively manage rust diseases without relying heavily on chemical treatments. With diligence and care, you can enjoy a thriving, rust-free garden.

Frequently Asked Questions

What are the early signs of rust infection in plants?

The early signs of rust infection in plants consist of pale spots on leaves, which subsequently progress into spore-producing pustules that may appear in orange, yellow, brown, or black hues. Prompt identification is crucial for effective management.

How can I prevent rust infections in my garden?

To effectively prevent rust infections in your garden, select rust-resistant plant varieties, water at the base of plants, ensure proper spacing for air circulation, and maintain good garden hygiene. Implementing these measures will significantly reduce the risk of rust development.

Are fungicides necessary for managing rust in home gardens?

Fungicides are generally unnecessary for managing rust in home gardens unless you are dealing with high-value plants with a history of severe infections. Consider other management practices before resorting to chemical treatments.

What impact do rust diseases have on edible crops?

Rust diseases significantly diminish flower and crop yield, increase susceptibility to pests, and adversely affect agricultural productivity. Hence, their control is essential for maintaining healthy edible crop production.

What are hyperparasites, and how do they help control rust fungi?

Hyperparasites, such as Darluca species, effectively control rust fungi by parasitizing them, which reduces their populations and helps limit the spread of rust diseases. This natural regulation is crucial for maintaining plant health.

Todd’s Marietta Tree Services

Marietta, GA
(678) 505-0266

Originally published on: https://www.toddsmariettatreeservices.com/managing-plant-rust-disease/